- Log in to your Pay Portal.
- Click Settings > Profile
- Make the changes.
- Click Save
If you are unable to update your information, please contact Paylution directly.
Our frequently asked questions service offers answers to common questions. If you don't find an answer, please contact our customer support and a representative will be able to assist you.
No Results
If you are unable to update your information, please contact Paylution directly.
Once created, you will receive an activation email containing your account number and a link you may click on to begin the activation process.
Auto Transfer allows you to set up automatic transfers of the funds from your Pay Portal to your bank account — so that you can set it and forget it!
In order to set up Automated Transfer, you will need to have a bank account linked to your Pay Portal.
To set up Auto Transfer in your Pay Portal:
1. Click on Transfer in your menu
2.Under Actions: select Create Auto Transfer
3. Select Confirm
Auto Transfer Advanced Options:
Advanced Auto Transfer options allow you to split transfers between 2 or 3 different bank accounts, as well as configure a minimum transfer amount.
Note: Under Additional Options you can choose the frequency of your Auto Transfer. You can choose either daily or monthly. If you choose monthly, you can select the date on which the first Auto Transfer is to take place.
Tip:
Please note: All Auto Transfer destinations selected must use the same currency. This means that you may not, for example, set one of your Auto Transfer destinations as a USD bank account and another as a CAD bank account.
If your organization allows it, you can transfer your Pay Portal balance to any bank account in your country.
To register a new bank account:
To transfer funds to a bank account that has already been registered on your Pay Portal:
To set up an auto transfer, click on Action > Create Auto Transfer.
Note: Bank transfers can take up to 3 business days to reflect on your account.
Users of iPhone and Android can download the mobile app from App Store and Google Play. Alternatively, all smartphones can go to https://www.paylution.com on your mobile browser to access your account.
Please note: Use of the mobile site and app store downloads are subject to the regular data rates charged by your mobile service provider. Your Prepaid Card provider is not responsible for these charges.
How do I log into the Pay portal?
1. Enter your Login ID and Password in the app's Login screen.The Overview screen can be considered the mobile app's homepage. It shows a list of portal and card balances for the user and the 5 most recent portal or card transactions. You can open the Overview screen by logging into the app.
Where can I view/update my app settings?
You can look up a transaction receipt from the transaction's Details screen. To open the Details screen, simply tap on a transaction in the Overview screen or History screen.
How do I view my transaction history?
No. Currently you can only update your portal profile using the Pay portal site. However, you can view a read-only instance of your portal profile from Settings > Account Profile.
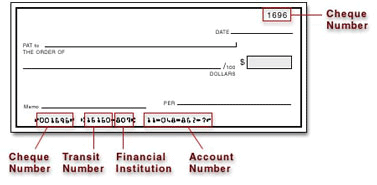
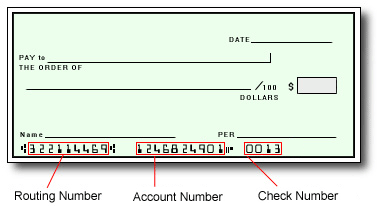
The best way to confirm that you have entered your banking information correctly is to refer to the numbers on the bottom of your check.
In Canada and the United States, your account information would be displayed as shown on the sample checks below:
Canadian Accounts:
American Accounts:
For all other regions, please refer either to your bank statement or contact your financial institution to confirm your banking information.
Password requirements:
If you're unable to access your Pay Portal and are receiving an "Error 104" message, contact us for assistance.
1. Tap on the Menu icon in the top-left corner.
2. Tap on History. The History screen will open.
3. Tap on a tab to view the 20 most recent transactions.
You can look up a transaction receipt from the transaction's Details screen. To open the Details screen, simply tap on a transaction in the Overview screen or History screen.
1. Tap on the Menu icon in the top-left corner.
2. Tap Transfer. The Transfer screen will open.
3. Select the portal, external account or card that will be involved in the transfer.
4. Select from the available transfer options.
5. Specify the Amount to transfer. You can select Total Balance to transfer the total balance instead.
6. Optional: add a Note for the transfer.
7. Tap Next.
8. On the Confirm screen, tap Confirm.
9. The Receipt screen will show a receipt for the transfer. Tap Close to return to the Overview screen.
No. The app only works with existing accounts that you have created using the website.
The PassWallet/Passbook command from the app's menu lets you create a "pass" for a card balance synchronized with the Paylution Pay Portal Pay Portal server. You can then look up the card to see your current balance for the card in the default Passbook app for iOS devices, or the 3rd-party PassWallet app for Android devices.
To create a pass:
Go to Settings > Notification and select/deselect Enable Notification as intended.
Please note: Push notifications must be enabled at the configuration level by the Program Operator for this feature to work.
How can I re-enable push notifications?
iOS users who have previously disabled push notifications and wish to re-enable them must do the following:
1. Open the default iOS Settings app.
2. Tap on Notification Center.
3. Browse to the hyperwallet mobile app under "DO NOT INCLUDE" and tap on it.
4. In the following screen tap on the intended ALERT STYLE (Banners or Alerts).
5. Optional: select Show in Notification Center to view alerts in the iOS notification center.
6. Optional: select Show on Lock Screen to view alerts on the iOS lock screen.
7. Exit the iOS Settings app.
*Charges from your wireless provider may apply.
Currently the following languages are supported by the app – English, French, German and Spanish. If your device's current language is one of the four supported languages, the appropriate one will be automatically selected, else English will be used.
Contact us:
Email Support
Please login and use the form provided under the Support section to send us your question. If you have issues logging in, please contact us by phone.
Telephone
Live Customer Support Representatives are available:
Monday - Friday from 6:00am - 5:00pm Pacific Time (14:00 - 01:00 GMT), Saturday & Sunday from: 8:00am – 5:00pm Pacific Time (16:00 - 01:00 GMT)
*English and Spanish starting from 6:00am Pacific Time with French, German and Mandarin support added at 8:00am Pacific Time
Chat